Step-by-step plan to install a bio ethanol fireplace yourself

The best thing about a sustainable bio ethanol fireplace is that you can build it yourself. You can design the design yourself and adjust it completely to your taste. In this blog we explain to you how to install a bio ethanol fireplace and what steps you need to take. When installing, you must pay close attention to the materials you use and of course the safety distances. In this way the risk is minimized.
OVERVIEW:
1 Introduction
2. Planning
3. Materials and tools
4. Step by step instructions
4.1 Marking/Marking
4.2 Create frame construction
4.3 Install and align plasterboard profiles
4.4 Installation of plasterboard
4.5 Filling the plasterboard construction
4.6 Plastering of the plasterboard construction
4.7 Sharpening
4.8 Installing/installing/mounting the bio ethanol built-in fireplace
4.9 Individual? No problem!
5. Examples from our customers
Introduction:
Some bioethanol fireplaces require extra attention during installation. If you have any questions, we advise you to contact our team of professionals at info@bioethanolhaarden.com. Installing the plasterboard and installing the fireplace can be taken over by various companies at a reasonable price. If you want to transfer the work, it is best to request between 2 or 3 no-obligation quotes from regional companies.
2. Planning
We assume that you have already made a choice from our bio-ethanol fireplace inserts and have determined the exact dimensions of the fireplace. If you need help making a choice, our team of experts at Bioethanolhaarden.nl are happy to provide you with personal and detailed advice about which built-in fireplace best suits your situation and ideas.
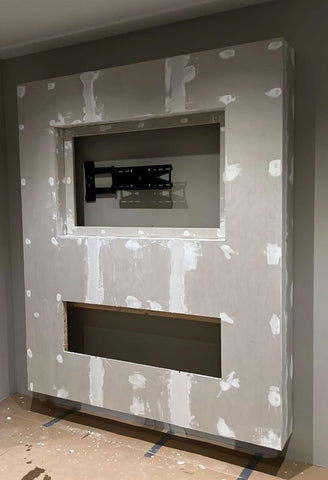
When installing the plasterboard structure, you must carefully consider the location and stability of the wall on which it will be placed. You must also take into account the desired structure of the construction, such as being flush with the floor and ceiling or hanging it 'floating' on the wall. You should also take into account any extra space for a television or shelves in the plasterboard construction next to the bio-ethanol built-in fireplace.
When placing a television above the bio-ethanol built-in fireplace, we recommend a minimum distance of 60 cm between the top edge of the built-in fireplace and the bottom edge of the television. A television can also be built into a drywall construction. In addition, you must determine the overall size of the plasterboard construction based on the bio-ethanol built-in fireplace model.
For safety reasons, we recommend a minimum depth of 40 cm for the plasterboard construction for all bio-ethanol built-in fireplaces. However, this does not apply to built-in fireplaces that are open on two or three sides. You are relatively flexible with regard to the height and length of the construction, but keep in mind that the length of the construction must be at least 40 cm longer than the chimney, so that there is at least 20 cm of buffer between the edge of the plasterboard construction and the outer edge of the chimney to the left and right of the chimney.
Once you have everything planned and gathered the necessary materials, you can get started. Please note that shipping of our fireplaces often takes several days, so it is wise to order the fireplace in advance.
3. Materials and tools
You will need the following materials and tools to install your bioethanol fireplace in drywall.
- Drill/cordless screwdriver
- Cutting knife/ruler
- Pencil/chalk/tape
- Chalk line
- paint roller/brush
- Screwdriver
- Hand sander/scouring sponge/sandpaper
- tin snips
The exact amount of materials depends very much on your project.
- Desired model bio-ethanol built-in fireplace from bioethanolhaarden.com
- Screws
- Drywall screws with drill
- Plasterboard anchors and screws
- Metal UW profiles for the frame construction
- Metal CW profiles
- Heat resistant paint
- Heat-resistant plasterboard
- Possibly heat-resistant paint/lacquer or, for example, tiles or natural stone slabs
4. Step by step instructions
4.1 Marking/Marking
STEP 1: MARKING The first and most important step in any manual task is to act attentively and stay focused. If you want to build a plasterboard structure ending at the floor and ceiling, first mark the dimensions of the future structure on the floor and ceiling (depth and length). If you want to build a "floating" structure that hangs from the wall, you will need to draw some guidelines on the wall. It is best to use a pencil, crayon or piece of tape in a striking color. To check if the marks are straight, you can use a spirit level, tape measure and chalk line. Make sure the markings are accurate before moving on to the next step: constructing the drywall frame.
4.2 Create frame construction
To create the frame construction, you will need uprights or profiles made of wood or metal. We recommend the use of metal profiles and describe this variant in this example. For this variant you use UW and CW profiles.
Start by cutting the UW profiles to size with tin snips. The UW profiles form the outer frame of the construction on the floor, walls and ceiling. Cover the back of the UW profiles with insulation strips and place the profiles on the marks you drew earlier. The UW profiles must be attached to the wall and ceiling one after the other. Check again whether the dimensions of the UW profiles correspond to those of the desired construction.
Screw the UW profiles accurately to the floor, wall and ceiling at a distance of approximately 50cm from the markings. For hard surfaces such as concrete, you must pre-drill and insert a rotating plug before screwing.
If you use wooden slats, you can attach them to the wall with a wood screw or dowel. If you use metal profiles, they can be attached directly to the wall with plugs and screws. Make sure that the UW profiles are attached straight and stably to the wall, floor and ceiling. Use a spirit level to ensure they are straight.
4.3 Install and align plasterboard profiles
To enable the stability and attachment of the plasterboards, the so-called CW profiles are required. These are the vertical intermediate posts within the frame construction. It is likely that the CW profiles will also need to be cut to size using tin snips, as with the UW profiles. During this step, the recess for the chimney must also be taken into account.
Slide the sawn CW profiles first at the bottom and then at the top of the UW profiles and make sure that they are aligned exactly vertically and always in the same direction. The exact alignment of the CW profiles is extremely important and the distance between the CW profiles depends on the size of the heat-resistant plasterboard. Under no circumstances may this distance exceed 62.5 cm.
Linking the CW profiles to the UW profiles is not absolutely necessary, but can contribute to the stability of the frame. After placing the entire frame, check again whether everything is straight and stable using a spirit level.
The frame may look different depending on your ideas and preferences. The purpose of the many cross beams is to create a base where the heat-resistant plasterboard can be screwed flush around the bio-ethanol fireplace insert and the TV. This gives the drywall a sturdy base to rest on and prevent it from coming loose.

4.4 Installation of plasterboard
As a first step, it is important to use heat-resistant plasterboard when constructing the wall. Some of the drywall will need to be trimmed to fit the dimensions of the frame. To cut the panels you will need to make marks and use a cutting knife and straight edge. Then you should gradually cover the drywall over the entire frame and tighten it with screws and a cordless screwdriver. Avoiding cross joints is essential to maintain the stability of the plasterboard.
The second planking ensures that the wall becomes more resilient. Cut the plasterboard so that the joint offset compared to the first planking is always at least 25 cm and attach the second planking with longer screws through the first planking and into the stud frame. Two variants are possible: with version 1 you already saw the plasterboard board to size for a recess of the exact dimensions of the fireplace, while with variant 2 the entire front is covered with plasterboard and you later draw a mark at the correct location for the fireplace. It is preferable to cut the plasterboard panels before mounting them on the frame.
Please note that some built-in fireplace models have a frame that hangs over the edge of the niche and the "box" placed in the niche may be slightly smaller. Therefore, check the technical drawing of your specific fireplace model for exact information and dimensions. To check that everything is working properly, you can place the fireplace and television in the niches, but this is not necessary and they will need to be dismantled again as the work has not yet been completed.

4.5 Filling the plasterboard construction
It is important to use heat-resistant filler when filling the plasterboard construction. Start by priming the entire construction so that the filler adheres well to the surface. Pay attention to the drying times of the primer. There are small gaps between the individual panels that must be sealed with the heat-resistant filler. The screw heads must also be filled, so that an even and flat surface is created on all sides. To prevent the floor from becoming dirty, it is advisable to place some cardboard, newspaper or an old blanket on the worktop.
4.6 Plastering of the plasterboard construction
If you want to plaster an even and filled surface of the plasterboard, brush plaster or roller plaster is most suitable. It is important to check whether this plaster is also heat resistant, which is usually the case.
Apply the plaster over the entire surface with a trowel, brush or paint roller, depending on which type you have chosen. Try to spread and spread the patch as evenly as possible, but keep in mind that it won't be perfect.
To get a perfect, even and uniform appearance without imperfections, you need to sand the wall or plaster. This can be done in various ways, such as with a hand sander, scouring pad or sandpaper. For plaster and putty it is recommended to use fine sandpaper with a grit of K120 or higher. Sand out any imperfections on the surface until you are satisfied with the appearance.
4.7 Sharpening
4.8 Installing/installing/mounting the bio ethanol built-in fireplace
The next part (4.9) can be inserted for this purpose. Please note, this is optional and the bioethanol fireplace can also be installed after sanding. Depending on the model, some fireplaces are precisely placed in the recess and practically remain in place. Other models are supplied with screws and are screwed into the plasterboard construction after installation. The specific procedure varies from model to model. We are happy to answer detailed questions in a personal conversation.
4.9 individuality and creativity in design
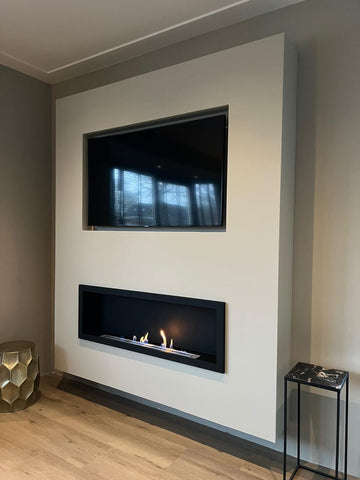
Incorporating a bio-ethanol fireplace into a plasterboard construction offers an excellent opportunity for individuality and creativity in the design. You can create a unique item that fits perfectly with your interior, ranging from color, paint to tiles and natural stone slabs. It is essential that you ensure that the materials used are heat resistant. For heat-resistant paint or varnish, you should paint the entire drywall using a brush or paint roller. You can also use a spray can, provided you mask everything well. Tiles or stone slabs can be attached to the plasterboard with a heat-resistant tile adhesive or similar. Keep in mind that you will probably need to cut some tiles/bricks to make them flush with the drywall surface.
If you wish, you can also install the bioethanol fireplace after grinding, even if you have already made the individual adjustments. Some chimneys fit snugly into the recess and practically hold themselves after being pushed into the recess. Other models are supplied with screws and are additionally screwed to the plasterboard construction after sliding in. The exact procedure varies per model. For further questions, we are happy to have a personal conversation with you.
Once the installation of the bioethanol fireplace is complete, you can put bioethanol in the tank, light the fire, sit back and relax. Admire the work done and enjoy the warm atmosphere of the fireplace. For inspiration, we would like to show you some photos and videos of bio-ethanol fireplace inserts in plasterboard constructions. We offer an extensive range of versatile bio-ethanol built-in fireplaces and are happy to advise you personally on all matters. Please feel free to contact us via info@bioethanolhaarden.com or the contact form on our website.
Please note: Bioethanolhaarden.com excludes any liability for incorrect and professional installation according to the instructions and misuse of the item. Make sure you observe personal safety and, if necessary, wear appropriate protective equipment when carrying out the work. Do not carry out this work if you are not familiar with the relevant rules. Whilst every effort is made to ensure the utmost accuracy, we accept no liability or responsibility for incorrect information.
5. Examples from our customers


